CReate your carousel
You can create your own carousel through the enabler :
First Step :
Create a Non Google Ad project and install our enabler (more details here).
Second step :
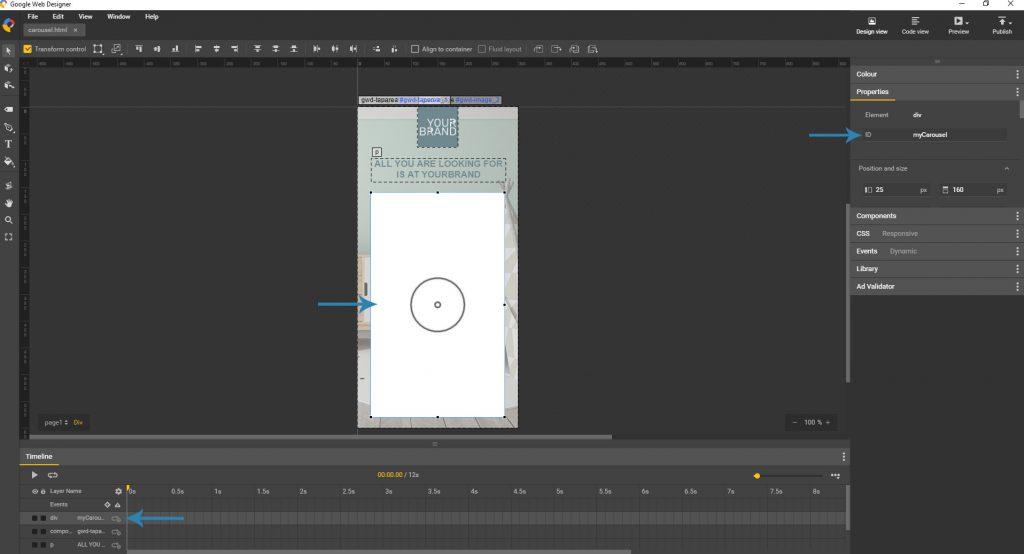
Create your banner, plan a container which host the carousel ADventori.
Give an id to its container.
Third step :
Go in the code pannel. Before the end of the body tag (</body>) insert script tag. All the javascript code necessary to the Carousel ADventori will be here.

The preview of the Carousel is not possible in the interface of Google Web Designer, you must go through the preview mode and thus display the banner containing your Carousel in your browser.
initialize your data feed :
To test our carousel, you can set default values after inserting the script. These values will be automaticaly replaced with dynamic values at the time of ad serving.
    var data = ADventori.initData({
        items: [
            {data:{name:"An Article",img:"https://cf-cdn.adventori.com/lp/enabler/templates/assets/310-barbecue.png",description:"A description of variable length",price:"99,99",original_price:"125,00",url:"https://www.google.fr/?q=test1",discount:"-15%" }},
            {data:{name:"An Article",img:"https://cf-cdn.adventori.com/lp/enabler/templates/assets/101-ventilateur.png",description:"A description of variable length",price:"149,99",original_price:"",url:"https://www.google.fr/?q=test2",discount:""}},
            {data:{name:"An Article",img:"https://cf-cdn.adventori.com/lp/enabler/templates/assets/107-Sac-a-outils.png",description:"A description of variable length",price:"79,99",original_price:"",url:"https://www.google.fr/?q=test3",discount:""}},
            {data:{name:"An Article",img:"https://cf-cdn.adventori.com/lp/enabler/templates/assets/321-dalle-bois.png",description:"A description of variable length",price:"79,99",original_price:"1000",url:"https://www.google.fr/?q=test4",discount:"-50%"}}
        ]
    });
The component expects an objects collection of items with properties :
name: Name of productimg: Picture of productdescription: Description of productprice: Price of productoriginal_price: Old price of producturl: url of productdiscount: the discound on the product
Initialisation du modèle de Slide :
Vous voulez créer la structure HTML suivante :
<div class="name">
    Name of product
</div>
<div class="img_container">
    Picture of product
</div>
<div class="description">
    Description of product
</div>
<div class="price">
    Price of product
</div>
<div class="original_price">
 Old price of product
</div>
<div class="discount">
 the discound on the product
</div>
<div class="cta">
    The CTA
</div>
Now you have to build your HTML structure thanks to the initSlide. You have to rewrite the initSlide method which have to return your HTML associated with your initData :
ADventori.Carousel.prototype.initSlide = function(data) {
        var result = '';
        var image = data.img;
        result += '<div class="name">' + data.name + '</div>';
        result += '<div class="img_container"><span class="img_helper"></span><img class="photos" src="' + image + '"></div>';
        result += '<div class="description">' + data.description + '</div>';
        result += '<div class="price">' + data.price + '<sup>€</sup></div>';
        if (data.original_price) result += '<div class="original_price">' + data.original_price + '<sup>€</sup></div>';
        if (data.discount) result += '<div class="discount"><div class="bgDiscount"></div><div class="valueDiscount">' + data.discount + '</div></div>'
        result += '<div class="textCta">' + this.conf.cta + '</div>';
        return result;
 };
We will declare this new Carousel and configure it:
var carousel = new ADventori.Carousel({
        items: data.items,
        hSplit: 1,
        vSplit: 2,
        insertHtmlStruct: true,
        carouselContainer:document.getElementById("myCarousel"),
        navPrev:'<div class="arrowPrev"></div>',
        navNext:'<div class="arrowNext"></div>',
        animation :'translateX',
        hiddenBullets:false,
        cta: '<span id="triangle"> ► </span><span id="go"> GO !</span>',
        autoStart: true,
        duration : 30000,
        interval : 3000,
        onSlide : function(nSlide) { myCallBack();}
});items: The dynamic values contained indatahSplit: Number of products per page with a horizontal displayvSplit: Number of products per page with a vertical displayinsertHtmlStruct: insert the HTML structure of the CarouselcarouselContainer: Container which will contain the CarouselnavPrev: add the navigation element “Prev” (it can be an img balise or a simple ASCII character)navNext: add the navigation element “Next” (it can be an img balise or a simple ASCII character)animation: add an animation during slides transition (animation available : none / skewY / rotateY / rotateX / scaleLittle / scaleBig / translateY / translateX / erase)hiddenBullets: hide bullets pointscta: « Call To Action » Content of the buttonautoStart: Enable/Disable Scrollingduration: Duration of the banner (in ms)interval: Duration time of a product (in ms)onSlide: Call a function on each slide change
You can make your own animation :
You have to create 3 CSS class with these suffix ( _active / _prev / _next)
monAnimation_active{
    left:0;
}
monAnimation_prev{
    left:-100%;
}
monAnimation_next{
    left:100%;
}
If you want to call your animation, you just have to write this line in your Carousel configuration : animation: ‘myAnimation’
Don’t forget to declare your CSS to design your Carousel !

